

How Do You Blend Out Bad Makeup In Photoshop
This chapter is from the book
Reality Retouching
Reality retouching should be invisible. Your mission is to exist as stealthy every bit possible—make it and out without being detected. Yous will probably not receive any credit for this mission because nobody'southward supposed to know nigh it. You, your client, and your team (if whatsoever) are the only ones who volition receive the quiet satisfaction of a job well done.
For the beginning example, consider an epitome that was designed as a bespeak of purchase (Pop) display for Reflexxions. As is typical with makeup companies, the customer wants the girl in the display to look as natural every bit possible, while still existence "perfect"—definitely a task for reality retouching.
 Image 5 An case of reality retouching.
Assessing the Prototype
It's important to starting time by assessing the prototype as a whole, and deciding more or less what you desire to practise beforehand. Working with the paradigm on the screen, make notes of the areas that need to be inverse. By taking the fourth dimension to do this assessment before "jumping right in," you will develop a clearer mental epitome of the final product. This will keep you from over- or underdoing any ane surface area and will aid you lot produce a amend-balanced concluding image. It's a skillful idea to have a mental checklist that you go over when assessing the image. Here's an instance check list:
-
Overall skin (including forehead, nose, cheeks, chin, and jaw)
-
Smooth the texture, remove bumps or major wrinkles.
-
Even out the color, conceal and alloy blemishes or uneven makeup.
-
Remove any unwanted shininess.
-
-
Hair
-
Eliminate any fly-aways.
-
Fill up in gaps.
-
Gear up color on roots.
-
-
Eyebrows
-
Check overall shape. Reshape if necessary.
-
Corral whatsoever loose or wild hairs.
-
Split unibrow.
-
-
Eyes
-
Brighten whites of optics.
-
Check for and remove mascara clumps.
-
Check for crow's feet, and blend away as needed.
-
Soften nether-eye circles.
-
Remove unwanted or distracting catch lights.
-
-
Olfactory organ
-
Even out or blend away unwanted shadows on sides of olfactory organ.
-
-
Lips
-
Bank check shape of lips. Define and reshape equally necessary.
-
Clean upwardly bleeding lipstick.
-
Clean upwardly and even out highlights on lips.
-
-
Teeth
-
Whiten teeth.
-
Correct slightly kleptomaniacal teeth.
-
-
Cheeks, chin, and jaw
-
Lessen deep smile lines or wrinkles.
-
Smooth evenness of blush on apple tree of cheek.
-
-
Torso parts (legs, arms, and so on)
-
Smooth tone and texture.
-
Improve contours of highlights and shadows.
-
As role of your assessment, decide what to leave and what to remove then that the job is believable. Frequently art directors will give yous specific guidelines for what they'd similar to run into done. On this item chore, I worked closely with the art director to decide what to remove and fix. Prototype 6 shows the fine art manager's marks indicating the changes she wanted made. Every bit you tin can see from all the marks, at that place'southward a lot of work to exist done for something that's supposed to look natural!
Afterward going over the raw image with the art manager, I and then begin the basics of retouching.
 Epitome half-dozen The marked-upwardly image showing changes requested past the art director.
Removing Wrinkles
Before y'all fifty-fifty remember near touching your Tool palette, be sure to duplicate your original layer. To do this, right-click the layer and select Duplicate Layer. Name the layer model copy. Work on the copy layer, and leave your original layer untouched. That way you lot will always accept a re-create to go back to for reference. I usually begin past using the Healing Brush tool to remove minor wrinkles and any stray hairs that may accept moved over the face during the shoot.
Keepin' Information technology Real: 1
Don't eliminate all the wrinkles when cleaning up the peel. If the person is smiling and yous take away all the wrinkles, it volition look odd and unnatural. Be aware of what yous remove and brand certain it's not crucial to the expression in the face up. You also can quickly assess your work by turning on and off the retouching layer. This is a visual aid in identifying unnatural changes.
 Image 7 Removing the brow contraction using a small brush.
Keepin' It Real: ii
When working with the Healing Brush, if yous want to lessen but not remove the wrinkles completely, become to the Edit card and select Fade Healing Brush. You can utilize the slider to lessen the effect of the brush and bring back some of the natural wrinkles.
Start by choosing a brush merely large enough to cover the surface area that needs to exist eliminated. You can apply the left and right subclass keys ([ and ]) to reduce or increase the castor size.
For the type of wrinkle shown here, which is modest and very linear, click i terminate of the wrinkle, hold down the Shift key (which makes the tool work in a straight line), and click to the end of that wrinkle line. You lot as well can use minor short strokes with the tool to accomplish the aforementioned result.
![]() Image 8 The Fade Healing Brush dialog box.
Image 8 The Fade Healing Brush dialog box.
Next, using the aforementioned technique, work on any stray hairs covering the face. Continue this procedure until you have eliminated all of these fine lines, hairs, and wrinkles.
TIP
All the colors you tin run into on your screen are created by mixing different amounts of the iii chief colors: red, dark-green, and bluish. For example, mixing crimson and green together produces colors such equally orange, yellow, and brown.
Photoshop stores the colour information of your image by keeping track of how much carmine, green, and blue to use for every pixel. Normally, Photoshop automatically mixes the ruby, dark-green, and blueish together for you lot and displays the outcome. At that place is, however, a way to view the private colors separately, before they are mixed, using what are called color channels. To view the unlike channels of an prototype, become to the Window carte and select Channels. (The Channels palette will display.) You lot will run across (for a normal color image) iv channels: one chosen RGB, which contains the mixture of all 3 colors; and i each for Carmine, Light-green, and Blueish, which contains only the information about how much scarlet, greenish, or blue is used at a specific spot.
You tin can view one channel at a time by clicking it in the Channels palette. Color channels can prove very useful for retouching because, when viewed in isolation, they can highlight subtle details that might exist harder to spot in the full-color image. In the retouching examples hither, I use the Greenish channel to assistance visualize areas where the texture of the model's peel needs to be smoothed.
Note: At that place are other systems besides the 3-colour RGB mode for keeping runway of color data in an image. The CMYK system (for cyan, magenta, yellow, and black) is commonly used when preparing images for four-color printing and has four channels of color rather than three.
 Image 9 The Channels palette in its default state.
Flawless Skin
I like to retouch in a little unlike way than most people. I discovered, when I started looking through the dissimilar channels to find out where all the garbage was hidden, that by and large speaking on Caucasian models the "junk" tin can be seen more readily in the Light-green channel. (For other ethnicities, information technology may be seen more readily through 1 of the other channels.) To highlight those bad areas that I need to concentrate on, I open a window (Window > Documents > New Window) with a view of the Dark-green channel, in add-on to my view of the total-color version. As you can see in the epitome, this Green channel view helps you to see those areas of crude skin texture more than easily. Notation that in the Dark-green channel window, even though you're but looking at the Green aqueduct, you want all the channels to be active. Otherwise, when y'all retouch, yous'll be painting in the color dark-green only. Active channels appear highlighted in the Channels palette equally seen in Image x.
To activate all channels while viewing only the Green channel, get to the Channels palette and click the RGB channel. Then click the middle icons side by side to the RGB, Cerise, and Blue channels to hide them.
 Image 10 The Channels palette, showing the setup for retouching while viewing the Light-green channel.
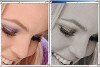 Image 11 Window setup for retouching.
Next, brand a layer (Ctrl+Shift+N) and telephone call it retouching. This layer is where you'll practice the work of smoothing the skin and making it flawless. Up until now, you've been using the Healing Brush. For the next footstep, however, switch to the Clone Stamp tool. The Healing Brush is nifty for creating repairs without disturbing texture and tone. At this stage, however, you want to disturb the texture and tone. That is why you will be using the Clone Postage to smooth and even out the skin. After you've selected the Clone Stamp tool, get to the Options settings and select an Opacity setting of between 20% and thirty%. Besides, brand sure the Use All Layers option is checked. The basic arroyo is to utilise the Clone Postage stamp similar an airbrush. For open areas such as the forehead, use a large brush size of well-nigh 100 pixels, going down to a smaller 60-pixel castor for more detailed work.
Working in the Green channel window, clone onto areas that need smoothing from adjacent areas of like surface texture and color tone. This requires a bit of practice until you lot get the "feel" of information technology, just information technology basically comes down to blending the tones and smoothing the texture—all the textures and tones need to match and smoothly blend together. Remember, you lot are creating a layer that volition be superimposed over the original, and then don't exist afraid of existence too heavy handed. You will demand to push button some pixels around (be nice) to get the desired results. This will become second nature at some point, simply for now just think "smooth, blended, and polished." When y'all're done, you'll take a layer of perfect smoothness that you can then blend back with your original layer to get the desired issue. Don't forget the cervix expanse likewise.
Ane of the peachy challenges, and most frequently asked questions, has to do with figuring out from where to clone. Looking at the image through the Green channel enables y'all to concentrate more on tone than colour. Detect a clean area of skin with the same tone of gray and use this equally your cloning source.
When you've smoothed out all the rough spots, you lot can await at your retouching layer by itself to see what areas y'all've retouched and as well what parts you may have missed. Yous should take a layer that looks something similar Image 12.
Looking at the prototype now, you may feel it's apartment or overdone. Well, you're right; it is! But don't worry—you aren't washed quite nevertheless. The trick is to get back some of the pare's original texture while retaining the smoothness you have only created. Close the new window showing the Light-green channel and get to the color one. In the Layers palette, select your retouching layer and change its Opacity to 55%. At present you have skin texture back, with even tone. (Yes, you can take your cake and eat it too!) The difference is subtle, just subtlety is exactly what reality retouching is all about. As you lot tin can run into from Prototype 13, cutting back that fleck of texture makes it await like flawless real peel, not digitally smoothed skin.
 Image 12 The retouching layer by itself, showing the areas retouched.
Pixel Measurements
Throughout this chapter, you will encounter various pixel dimensions for things such as castor size and feathering of selections. These dimensions are based on the 300 dots per inch (dpi) resolution of the example images. If you are working on higher- or lower-resolution images, you must calibration these case pixel dimensions up or downwards accordingly.
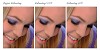 Prototype 13 The effect of irresolute the opacity of the retouching layer.
Perfect Eyebrows
Eyebrows! I practice more piece of work on eyebrows than you could mayhap imagine. They are extremely of import considering they frame the eyes and convey so much of a face'due south expression. Unruly, misshapen, fuzzy, or sparse brows can really detract from the advent of an image. Unfortunately, because real eyebrows are near never perfect, they commonly have to be fixed in Photoshop. In this case, the brows were a petty "unruly," and the art director wanted me to make clean them up and change the shape a flake.
![]() Prototype 14 The eyebrows before and after retouching.
Prototype 14 The eyebrows before and after retouching.
To attain this sharper, cleaner, more than-finished forehead, begin by removing stray hairs with the Healing Brush. Side by side, apply your Lasso tool (Fifty key) to catch a piece of pare from above the brow (meet Prototype 15). Feather your selection past iv pixels and copy the area, including all the retouch work, using the Copy Merged command (Shift+Ctrl+C). Next, paste the selection into a new layer and use the Move tool (letter V) to motility information technology to cover unwanted brow, as shown in Image 15.
Deselect (Ctrl+D) and soften the edges of your copied skin surface area using the Eraser tool (brush size 60) at 50% Opacity. You can encounter that the top of the brow line is much cleaner now, and you lot've achieved it without disturbing the skin texture.
Proceed this process beyond the entire top of the eyebrow to make a make clean, finished brow.
 Image xv Selecting a piece of pare above the brow and covering the unwanted brow (removing stray eyebrow hairs).
A Fiddling Dentistry
Next, we whiten the teeth. This is a unproblematic thing, merely it makes the paradigm much more attractive. First cull your Magic Wand tool (letter of the alphabet W), ready the Tolerance to 25, and click the teeth to plant an initial pick. Next, hold downwardly the Shift cardinal and go along clicking areas of teeth that were not included in the initial option, until all the teeth are part of the option.
 Image 16 The selection for whitening the teeth.
To refine your selection, go to Quick Mask mode (letter of the alphabet Q) and use your Paintbrush (letter B) tool to modify the mask. Remember, in Quick Mask mode, painting in white removes masking from an area, adding it to your pick, whereas painting in blackness adds in masking, removing areas from your option.
Now that you lot have a refined mask, feather the selection radius by four pixels (Select > Feather) to give a squeamish blended edge.
Side by side, use the Levels control to conform the whiteness of the teeth. Click the model re-create layer to actuate information technology, and then open up the Levels dialog box by adding an adjustment layer (Layer > New Adjustment Layer > Levels), and move the middle slider to the left a bit. Dissimilar amounts of whitening are called for in every image, so utilize your ain judgment and experiment until it looks correct to you.
 Image 17 The quick mask of the selected teeth.
 Image 18 The Channels palette in Quick Mask style.
Changing the Quick Mask Colour
When using the quick mask in an area where red is a predominant color, yous will want to change information technology from its standard color red to something else, such every bit blue, as I accept done in Image 16. To do this, double-click the quick mask icon in the toolbar, and then double-click once more the colour box in the dialog box that appears. Your color picker displays, and from it you lot tin can choose whichever color yous like.
 Image 19 Using the Levels control to whiten the teeth.
![]() Image 20 Earlier and afterward whitening the teeth.
Image 20 Earlier and afterward whitening the teeth.
Happenin' Hair
All correct, now for one of my specialties...pilus! As is frequently the case, I accept some areas that need pilus added, and others that need hair removed. Permit's start with the right side, where I am going to popular the model out of the groundwork, removing some hair and part of the shoulder in the procedure. The hardest office of removing this background volition be to keep the eyelashes intact, considering they stick out past the edge of the model's face and are overlapping into the surface area I demand to remove. When yous effort this, make sure you are on the model copy layer. Then, begin by selecting large areas of the background with the Magic Wand. After yous've gotten most of the background selected, begin refining the mask in Quick Mask mode by using a brush to clean upwardly and define the edges that delineate the model from the background. Good masks are the central to getting adept edges! The longer you spend in this mode refining the mask, the less work y'all'll have subsequently on. Skilful masks are your friends!
After y'all've finished your mask, leave Quick Mask fashion and feather the selection past 2. And so salve your painstakingly created option. To practise this, click the layer mask icon at the bottom of the Layers palette. This creates a layer mask from the selection. After you have converted your choice to a layer mask, it will appear equally a new blastoff aqueduct in the Channels palette. This blastoff channel of your selection enables y'all to further refine your mask in the subsequent steps. Deselect the agile selection, open the Channels palette, and click the alpha aqueduct you just created. This turns off all the color, leaving you with a blackness-and-white silhouette of your mask. Whatever bits and pieces you may have missed volition at present exist hands visible, and you'll be able to go in with a white paintbrush and eliminate them. Also, considering you feathered the edge, you'll desire to get back and cut-in the mask around the eyelashes with a small, fairly hard-edged paintbrush.
Afterwards yous have perfected your mask, it's time to popular the model out of the background. Turn the RGB channel back on by clicking it in the Channels palette. This activates and makes visible all the RGB color channels, and deactivates and hides the alpha channel with your mask in it. The Channels palette should now look like Image 24.
 Epitome 21 The quick mask for the hair. Note that the quick mask colour is set to bluish.
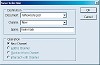 Image 22 The Save Selection dialog box.
 Prototype 23 The alpha channel of the pilus mask.
 Image 24 The Channels palette showing the alpha channel deactivated.
Next you lot need to plough your mask back into a selection. Ctrl+click the alpha channel you created; marching ants outlining your selection should appear in the paradigm. Make certain your bottom "original" layer is subconscious, actuate your model re-create layer by clicking it, and press the backspace key. Voilá, the background disappears (see Paradigm 25)! Y'all may however need to go in and refine those lashes one more time, but everything else should be pretty good correct at this point.
Retouching hair is tricky because y'all tin can't clone it, and healing it but works in small areas. And then here is my secret: I never retouch hair. I only copy, paste, and transform. That's the simply way I have found to keep the texture of the hair from getting dirty. In this case, the commencement thing you are going to do is crop the paradigm downward. You lot need plenty of room on the right for type anyway, and cropping volition besides go out you with less pilus to fill in.
Later you've cropped the image, you lot actually only have a corner to deal with. Past luck of the describe, you as well have one very overnice piece of blonde hair that looks like a good candidate for the copy/paste/transform technique. Select that slice using the lasso, feather it by 5, and then use Re-create > Paste (Ctrl+C and Ctrl+Five, respectively) to make a copy and paste it dorsum into the file as a new layer.
Now just move the pasted hair over to the left. And so, using the Gratis Transform command (Ctrl+T), pull up and out on the upper-left corner and rotate the pick slightly counterclockwise. The idea is to friction match the fashion the hair is falling. After feathering out the edges with a soft brush, the pilus transplant should be near undetectable if washed properly.
Adjustment Layers
E'er use adjustment layers to brand these kinds of corrections; that way y'all don't alter any valuable pixels. If you don't utilize an adjustment layer, you lose the flexibility to modify your mind later. With adjustment layers, y'all can go on playing with the settings without making whatever changes to whatsoever of the pixels.
Adjustment layers will become your friends. The great affair about irresolute things with adjustment layers is that if the art director comes dorsum and says "No, it needs to be royal," y'all already accept your selection, and all you have to practice is double-click to bring the dialog box support. This proves very useful given how oftentimes fine art directors modify their minds!
 Prototype 25 Afterwards deleting the masked-out hair
![]() Image 26 The selection of hair to re-create and paste in.
Image 26 The selection of hair to re-create and paste in.
Image 27 The pilus afterward pasting and transforming.
Overall Look and Feel
Now that all the retouched elements are in place, y'all need to take a concluding wait at the overall appearance of the epitome. The epitome at this point looks a little flat and a niggling dark, and so you lot're going to use an aligning layer to accommodate the curves. First, make certain you are on the top layer of your document and then that the adjustment layer will affect all the layers below. Then make an adjustment layer for the curves (Layer > New Adjustment Layer > Curves).
Place the cursor over the prototype and click the paradigm where you recollect the tones await apartment; you lot will come across a pocket-size circle announced on the line in the dialog box. This will give you an idea of where to grab the bar. Ctrl+click to marking this spot. Pull upwardly and down to lighten and darken. Play effectually hither until the image looks a piffling more brilliant and punchy.
A Few Final Touches
When you accept it where you like it, take a break. Step dorsum from the calculator, remove your hands from the keyboard...become await at a tree. You need to get some altitude and so that you tin tell whether you demand to exercise anything else. I frequently find things that the art director has missed. Why? Because the art director hasn't had the luxury of seeing it in this state, yous take the take a chance to come across information technology before anyone else, and sometimes things will just spring out at you. For case, now that I have lightened the paradigm considerably, I can see that the lips need to be more than pink and mayhap a niggling more intense. I remember when I shot this image the lip color was a little more vibrant. So, what tin can I do? Well...it's easy.
First you need to select the lips using the Polygon Lasso tool (see Image 28) and plumage by 2. When you take an active selection, the pick volition get a layer mask for your adjustment layer. This mask controls where the subsequent effect shows upwardly in the image. Now add an adjustment layer for Selective Color (Layer > New Aligning Layer > Selective Color) and conform the reds to the desired tone. I love Selective Color adjustment because yous can really change hues so subtly (see Paradigm 29).
 Image 28 The selection around the lips.
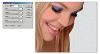 Image 29 Using the Selective Color options to adjust the intensity of the lip color.
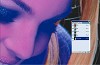
All there is left to do now is paste in the background file. You need to make your sheet larger to conform the last proportions. Enlarge the canvas (Epitome > Canvas Size) to xi.5x13 inches, making sure yous anchor the image to the left side and to the tiptop (run across Image 30). At present open up your background file, and and then copy and paste information technology into the concluding file. Brand sure that the new groundwork layer is below the model copy layer, but above your original layer.
 Image 30 Anchoring and resizing the canvas.
Your final should look like Image 31.
After yous paste the background in, you may want to make a close-up inspection of how the model image blends with the sky prototype just to make sure that at that place are no rough spots that need further attending (run into Image 31).
Okay, so that'due south information technology for reality retouching. Adjacent, we'll go on to plastic surgery, which includes tips and tricks that build on the basics y'all've learned here.
 Image 31 Final image for reality retouch (contrary).
Source: https://www.peachpit.com/articles/article.aspx?p=101733&seqNum=3
Posted by: ferrellmoderithe.blogspot.com
0 Response to "How Do You Blend Out Bad Makeup In Photoshop"
Post a Comment